どうも、こんにちは。江嵜です!
今日は HTML5 と JavaScript でビデオプレーヤーを作ってみましょう!
「Web でビデオプレーヤーなんて作ろうと思ったら、結構めんどくさいんじゃないの?」とお思いのアナタ!
HTML5 からは全然そんなことないんです!ほんの数十分でビデオプレーヤーを作れてしまいますよ。
案ずるより産むが…で、とりあえずコード書いてみましょう!
今回作るもの
今回、こんな感じのものを作ってみましょう。
操作はシンプルに、動画を操作するための Start・Stop・Pause。
あとはフルスクリーン表示と、動画読み込み用のボタンを配置しました。
それと動画の下にあるプログレスバーですね。
こちらも操作可能ですよ。
コーディング!
今回は HTML, JavaScript, そしてデザインの為の CSS が必要ですね。
あと、動画選択前に表示しておく画像が 1 枚。
全て同じフォルダに保存して(ファイル名はそれぞれの項目に書いてある物を指定してくださいね)、
html ファイルをブラウザで開けば実際に試せますよ。
HTML
ファイル名は index.html で保存しましょう。
30 行もないのでそんなに難しくないですね。
<!DOCTYPE html>
<html>
    <head>
        <title>Video</title>
        <meta charset="utf-8">
        <link rel="stylesheet" href="style.css" type="text/css" />
        <a href="http://index.js">http://index.js</a>
    </head>
    <body>
        <section>
            <video id="video-player" poster="poster.png"></video>
            <div id="progress-wrap">
                <div id="progress-out">
                    <div id="progress-in"></div>
                </div>
            </div>
            <div id="controller-box">
                <button id="video-play">Play</button>
                <button id="video-stop">Stop</button>
                <button id="video-pause">Pause</button>
                <button id="video-fullscreen">FullScreen</button>
                <button id="video-select">File</button>
            </div>
            <input id="video-file" type="file"/>
        </section>
    </body>
</html>
JavaScript
こちらも 100 行未満の簡単なコードです。
あっさりこれだけでビデオプレーヤーが作れるなんてオドロキですね!
index.js という名前で保存しておきましょう。
const main = () => {
    const video = document.getElementById('video-player');


    // ビデオファイル選択ボタン
    const fileSelector = document.getElementById('video-file');
    const videoSelectButton = document.getElementById('video-select');
    videoSelectButton.addEventListener('click', (e) => {
        e.preventDefault();
        e.stopPropagation();
        fileSelector.click();
    });

    // ビデオファイル選択
    fileSelector.addEventListener('change', (e) => {
        const file = e.target.files[0];
        if (!file.type.match('video.*')) {
            console.log('This file is not video.');
            return;
        }

        video.src = window.URL.createObjectURL(file);
        video.load();
        video.play();
    });


    // ビデオ再生ボタン
    const videoPlayButton = document.getElementById('video-play');
    videoPlayButton.addEventListener('click', (e) => {
        e.preventDefault();
        e.stopPropagation();

        video.play();
    });


    // ビデオ停止ボタン
    const videoStopButton = document.getElementById('video-stop');
    videoStopButton.addEventListener('click', (e) => {
        e.preventDefault();
        e.stopPropagation();

        video.pause();
        video.currentTime = 0.0;
    });


    // ビデオポーズボタン
    const videoPauseButton = document.getElementById('video-pause');
    videoPauseButton.addEventListener('click', (e) => {
        e.preventDefault();
        e.stopPropagation();

        video.pause();
    });


    // ビデオフルスクリーンボタン
    const videoFullScreenButton = document.getElementById('video-fullscreen');
    videoFullScreenButton.addEventListener('click', (e) => {
        e.preventDefault();
        e.stopPropagation();
        if (video.requestFullScreen) {
            video.requestFullScreen();
        }
        else if (video.webkitRequestFullscreen) {
            video.webkitRequestFullscreen();
        }
        else if (video.mozRequestFullScreen) {
            video.mozRequestFullScreen();
        }
        else if (video.msRequestFullscreen) {
            video.msRequestFullscreen();
        }
    });


    // プログレスバー長さ更新
    const progressOut = document.getElementById("progress-out");
    const progressIn = document.getElementById("progress-in");
    video.addEventListener('timeupdate', () => {
        progressIn.style.transform = `scaleX(${video.currentTime / video.duration})`;
    });


    // プログレスバークリック時イベント
    progressOut.addEventListener('click', (e) => {
        const percent = (e.pageX - (progressOut.getBoundingClientRect().left + window.pageXOffset)) / progressOut.clientWidth;
        video.currentTime = video.duration * percent;
    });
};


document.addEventListener('DOMContentLoaded', () => {
    main();
});
CSS
こちらも 100 行もないですね。
style.css の名前で保存しておきましょう。
* {
    margin: 0;
    padding: 0;
    box-sizing: border-box;
}

html {
    width: 100%;
    height: 100vh;
}

body {
    width: 100%;
    height: 100%;
    background: linear-gradient(-45deg, #536976, #292E49);
}

section {
    margin: 1rem auto;
    width: 80%;
}

video {
    width: 100%;
    border-radius: 3px;
    box-shadow: 1px 1px 3px rgba(0, 0, 0, 0.3);
}

button {
    padding: 0.5rem 1rem;
    border: 0;
    color: #ECEFF1;
    border-radius: 3px;
    background-color: #3F51B5;
    box-shadow: 1px 1px 3px rgba(0, 0, 0, 0.3);
    cursor: pointer;
    transition: 0.3s;
}

button:hover {
    box-shadow: 3px 3px 3px rgba(0, 0, 0, 0.5);
}

button:active {
    box-shadow: 3px 3px 3px rgba(0, 0, 0, 0.5) inset;
}

#progress-wrap {
    width: 100%;
    height: 1rem;
}

#progress-out {
    width: 100%;
    height: 100%;
    background-color: rgba(0, 0, 0, 0.2);
    border-radius: 3px;
    box-shadow: 1px 1px 3px rgba(0, 0, 0, 0.3);
    transform: scaleY(0.5);
    transition: 0.3s;
}

#progress-out:hover {
    transform: scaleY(1.0);
    box-shadow: 1px 1px 3px rgba(0, 0, 0, 0.5);
    cursor: pointer;
}

#progress-in {
    margin: 0 auto 0 0;
    width: 100%;
    height: 100%;
    background-color: #3F51B5;
    border-radius: 3px;
    transform-origin: top left;
    transition: 0.1s;
}

#controller-box {
    margin: 2rem auto;
    text-align: center;
}

#video-file {
    display: none;
}
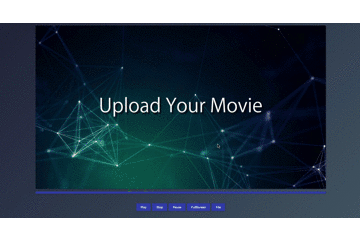
画像
最後に、ビデオ読み込み前に表示しておく画像。
これは何でもいいのですが、とりあえず今回使用したものを置いておきますね。
poster.png の名前で保存を。
<img src="https://www.agent-grow.com/self20percent/wp-content/uploads/2018/07/poster.png" alt="" width="800" height="450" class="alignnone size-full wp-image-9040" />
解説!
実際に動かしてみましたか?
たったこれだけのコードでビデオプレーヤーが作れるんですね。
それでは、HTML と JavaScript のファイルについて、キーポイントを軽く押さえていきましょう。
HTML
HTML ファイルは取り立てて色々書くことはないのですが、
一か所とても重要なところがありますね。
9 行目 – video タグ
最も重要な点とはここ!
<video id="video-player" poster="poster.png"></video>
video タグですね!
これだけで動画を再生する下地がすべてそろってしまいます!
今回は動画を JavaScript で操作するので使用していないですが、 <video controls></video> のように、 controls を指定すると
ブラウザ側が用意しているデフォルトのコントローラーを表示されることができます!
これだけでもビデオプレーヤーが作れてしまいますね!
24 行目 – input file
後は input ですね。
<input type="file"> は CSS でのデザイン変更が難しいため、
要素全体を CSS で隠して、別に用意したボタンがクリックされた際に、こちらがクリックされたことにするようにしていますよ。
<br />
JavaScript
JavaScript は全て解説していると結構な分量になってしまうので、 動画に関係あるところのみ。
その他は分からない箇所は google 検索にかければ大体出てきますよ!
22 ~ 24 行目 – 動画読み込み ~ 再生
video.src = window.URL.createObjectURL(file);
video.load();
video.play();
video 変数には、上の方で video 要素を取得して代入してあります。
あまり見慣れないのは window.URL.createObjectURL() ですね。
こちらは、与えられたファイルを参照できる URL を、ブラウザが内部で生成してくれる機能です。
全部動画ファイルを読み込んでもいいのですが、そうするとちょっと重いのでこの方法で。
URL を video.src に代入するだけで動画の設定は OK!
あとは video.load() で実際に読み込みをさせて、 video.play() で再生!
動画再生は実質 3 行だけでできているんですね!
34, 44 ~ 45, 55 行目 – 動画操作
video.play();

video.pause();
video.currentTime = 0.0;
video.play() はもう出てきましたね。
こちらが再生なら、止める方は video.pause() です。
あと stop が必要ですが、こちらは単純に video.pause() で再生を止めた後、再生位置を最初に戻せばいいですね。
ということで、再生位置は video.currentTime に秒で格納されているので、ここに 0 を入れれば最初に戻ります。
video.currentTime は普通に変数のように扱えるので、現在の再生場所を参照したい場合も単純に video.currentTime を呼び出せば OK。
これ以上簡単になりようがないほど、至れり尽くせりですね。
64 ~ 75 行目 – フルスクリーン
if (video.requestFullScreen) {
    video.requestFullScreen();
}
else if (video.webkitRequestFullscreen) {
    video.webkitRequestFullscreen();
}
else if (video.mozRequestFullScreen) {
    video.mozRequestFullScreen();
}
else if (video.msRequestFullscreen) {
    video.msRequestFullscreen();
}
実はフルスクリーンもとっても簡単で、フルスクリーン表示したい要素に対して requestFullScreen() を呼び出すダケ!
ただ、まだこちらは新しく、ブラウザごとにベンダープレフィックスが必要なことも。
関数があるかどうかを if で確認して、あれば実行する書き方は JavaScript の特徴的な書き方ですね!
82 ~ 84 行目 – プログレスバー表示
video.addEventListener('timeupdate', () => {
    progressIn.style.transform = `scaleX(${video.currentTime / video.duration})`;
});
video 要素の timeupdate イベントを使用すると、 currentTime が更新された時点でイベントが発火されます。
progressIn はプログレスバーの div 要素ですね。
この div の横幅を、CSS の transform を使用して横方向のスケールを変更して、プログレスバーの動きを表現しています。
動作だけ見ると、めんどくさい処理を書く必要がありそうなところですが、CSS を使えばたった 3 行で書けてしまうのですね。
88 ~ 91 行目 – プログレスバークリック
progressOut.addEventListener('click', (e) => {
    const percent = (e.pageX - (progressOut.getBoundingClientRect().left + window.pageXOffset)) / progressOut.clientWidth;
    video.currentTime = video.duration * percent;
});
こちらもめんどくさそうなプログレスバーをクリックしたときの挙動ですが、たった 4 行で書けていますね。
percent 変数の計算の仕方については説明するとちょっと長くなってしまうので、別途調べていただきたいところです。
ここでも currentTime に秒数を放り込めば、そこへ移動するというとっても便利な機能のおかげで、これだけ短いコードになっているのですね。
まとめ
少し昔ではバリバリ JavaScript 書かないと作れなかったビデオプレーヤーですが、
HTML5 を使えばこんなに簡単に動画を使えるようになりましたね。
とても簡単に使えるので、動画を使用した Web ページはこれからもドンドン増えていきそうです。
ぜひ皆さんも、Web で簡単に扱えるようになった動画を、ご自身の Web サイトにうまく取り入れてみてくださいね!